Integrating MidiStickers with other software
MidiStickers can be used alongside other MIDI software, such as your DAW or music notation software. Since the software was not designed as a plugin, virtual MIDI cables are needed to exchange MIDI data.
Choose your operating system below for platform-specific guides.
Setting up MIDI integration on Windows
MIDI ports in Windows are exclusive, so a Virtual MIDI Cable (loopback) application is required. We strongly recommend LoopMidi.
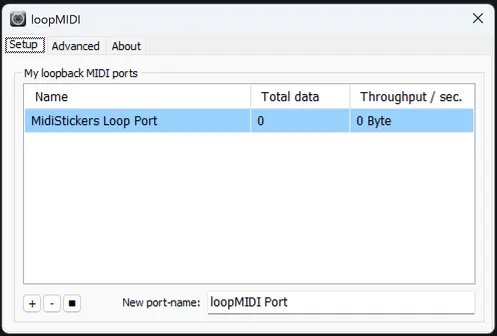
Once LoopMidi is installed in your system, run the application and create a Virtual MIDI Port, before starting MidiStickers. Let’s call this port “MidiStickers Loop Port”.
LoopMidi actually creates two ports: a MIDI IN port called MidiStickers Loop Port, and a MIDI OUT port with the same name, making them easy to match.
1) Scenario 1: Receiving MIDI Input to MidiStickers
In this scenario, we want to receive MIDI from your DAW, Notation Software, Max/Pure Data, or any other MIDI-capable application.
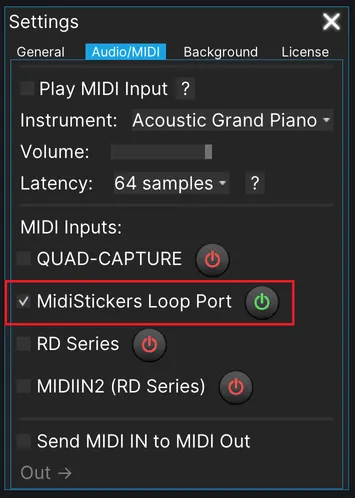
First, open the Audio/MIDI Settings in MidiStickers and enable the MidiStickers Loop Port in the MIDI Input section.
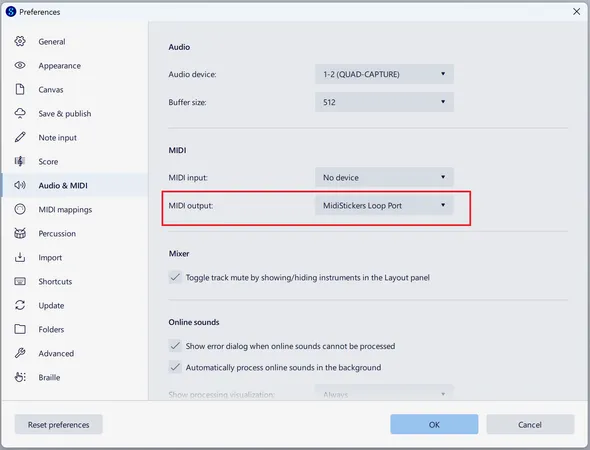
Next, route the MIDI Output of your external software to the MidiStickers Loop Port. The screenshot below shows MuseScore’s Audio/MIDI settings as an example:
That’s it! Remember that by using the Overlay Mode you can also combine MidiStickers visually with other software, including setting any widget background to be fully transparent.
2) Scenario 2: Sending MIDI Input from MidiStickers
In this scenario, we want to send MIDI to other software. This can be MIDI received by MidiStickers from a MIDI instrument, or MIDI generated internally by MidiStickers (for example, by the integrated MIDI Player or the Negative Harmony widget).
In both cases, the setup is the same.
In MidiStickers’ Audio/MIDI Settings, first make sure that MidiStickers Loop Port is disabled in the MIDI Input section.
Then, enable the “Send MIDI IN to MIDI OUT” checkbox and route it to MidiStickers Loop Port.
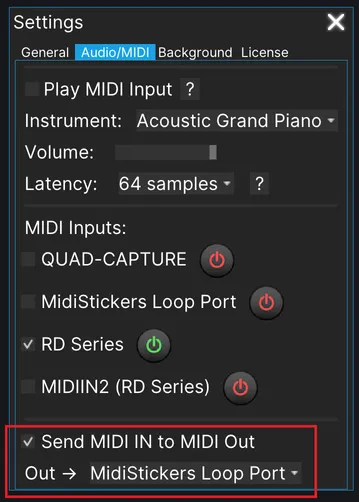
In the image above, you can see that RD Series is enabled. This is our MIDI controller, and its input will be forwarded to the MidiStickers Loop Port.
Now, use MidiStickers Loop Port as the MIDI Input in the target software.
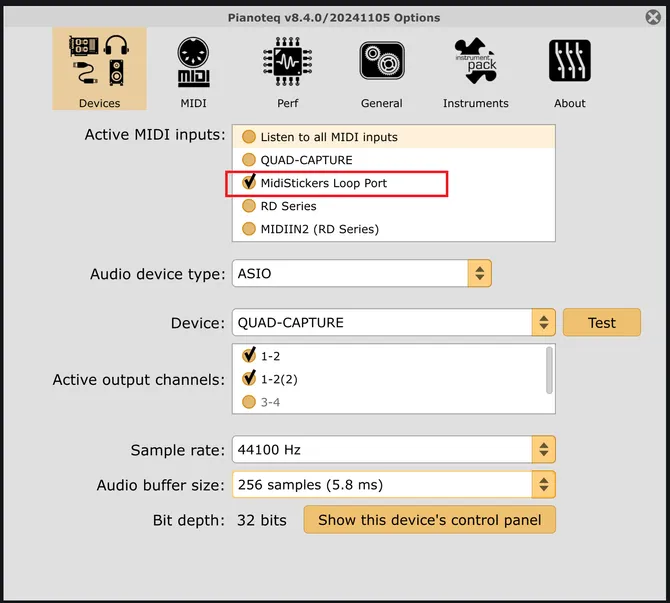
For example, the screenshot below shows the MIDI input configuration in Pianoteq:
Setting up MIDI integration on macOS
On macOS, use the native IAC Driver to route MIDI information between different applications.
If you want to receive MIDI, route your external software output to the IAC Driver and then enable IAC Driver input on MidiStickers on the Audio/MIDI Settings window.
If you want to send MIDI from MidiStickers to external software, ensure the IAC Driver is disabled on MidiStickers’s input settings, then route the MIDI Output in MidiStickers to the IAC Driver.
Refer to the Windows guide for visual examples.